Snow Sprint wrap-up, and introducing Tweet Engine
Posted by Nick Johnson | Filed under python, coding, tweet-engine, tech, snow-sprint
It's Friday evening, which means the Snow Sprint is wrapping up, and everyone's presenting their App Engine apps. There's some pretty impressive work been done in a mere 5 days...
Tweet Engine
First up is us! Myself, Jens Klein, and Sasha Vincic teamed up to write Tweet Engine, a twitter webapp for collaborative tweeting. Many organisations - both companies and open source groups - have shared twitter accounts. Using these shared accounts, however, can be a huge pain, especially if you have multiple accounts to manage. The goal of Tweet Engine is to make this more manageable.
Anyone can sign up by logging in with their Google account. Once signed up, you can add any number of Twitter accounts. We use the Twitter OAuth library, which allows us to obtain permission from a user without prompting you for your password.
Once you've added an account, you can give any number of other people permission to use it. Access is configurable, including full administrator access, just the ability to send and view tweets, or just the ability to suggest tweets for review and approval. Once a suggestion is submitted, anyone with sufficient permissions can approve or decline it. Scheduled ...
ReferenceProperty prefetching in App Engine
Posted by Nick Johnson | Filed under python, tech, app-engine, cookbook, coding
This post is a brief interlude in the webapps on App Engine series. Fear not, it'll be back!
Frequently, we need to do a datastore query for a set of records, then do something with a property referenced by each of those records. For example, supposing we are writing a blogging system, and we want to display a list of posts, along with their authors. We might do something like this:
class Author(db.Model):
  name = db.StringProperty(required=True)

class Post(db.Model):
  title = db.TextProperty(required=True)
  body = db.TextProperty(required=True)
  author = db.ReferenceProperty(Author, required=True)


posts = Post.all().order("-timestamp").fetch(20)
for post in posts:
  print post.title
  print post.author.name
On the surface, this looks fine. If we look closer, however - perhaps by using Guido's excellent AppStats tool, we'll notice that each iteration of the loop, we're performing a get request for the referenced author entity. This happens the first time we dereference any ReferenceProperty, even if we've previously dereferenced a separate ReferenceProperty that points to the same entity!
Obviously, this is less than ideal. We're doing a lot of RPCs, and incurring a lot of ...
Webapps on App Engine part 3: Request handlers
Posted by Nick Johnson | Filed under python, coding, app-engine, tech, framework
This is part of a series on writing a webapp framework for App Engine Python. For details, see the introductory post here.
Now that we've covered the background on request handling, it's time to tackle request handlers. Request handlers are the core and most obvious part of a web framework. They serve to simplify the writing of your app, and remove some of the boilerplate that you end up with if you write raw WSGI applications. Before we go any further, let's see what basic request handlers look like in a range of frameworks. Then we can discuss the pros and cons of each, and settle on one for ours.
def current_datetime(request):
    now = datetime.datetime.now()
    html = "It is now %s." % now
    return HttpResponse(html)
App Engine's webapp framework:
class MainPage(webapp.RequestHandler):
    def get(self):
        self.response.headers['Content-Type'] = 'text/plain'
        self.response.out.write('Hello, webapp World!')
@expose('/display/')
def display(request, uid):
    url = URL.query.get(uid)
    if not url:
        raise NotFound()
    return render_template('display.html', url=url)
def hello1():
    return "Hello World"
class HelloController(BaseController):

    def index(self):
        # Return a rendered template
        #return render('/hello.mako')
        # or ...
Webapps on App Engine part 2: Request & Response handling
Posted by Nick Johnson | Filed under python, tech, app-engine, coding, framework
This is part of a series on writing a webapp framework for App Engine Python. For details, see the introductory post here.
This post is mostly background on request and response encoding/decoding. If you're already fairly familiar with how this works in CGI and in higher level frameworks, you may want to skip this and wait for the next posting, on request handlers.
If you've ever written a CGI script, you'll be well aware of how much of a pain interpreting and decoding CGI environment variables and headers can be - so much so that the first action of many is to find or write a library to handle it for you! And if you've ever coded in a CGI-inspired language such as PHP, you're probably familiar with how much of a pain managing the combination of response headers and output content can likewise be.
As a result of this, one of the most basic tools a framework offers is some form of abstraction for request and response data. Typically, this takes care of collecting and parsing HTTP headers, parsing the query string (if any), decoding POSTed form data, and so forth. Better frameworks also ...
Webapps on App Engine part 1: Routing
Posted by Nick Johnson | Filed under python, coding, app-engine, tech, framework
This is part of a series on writing a webapp framework for App Engine Python. For details, see the introductory post here.
The first part of a framework you encounter when using one is, more often than not, the routing code. With that in mind, it's what we'll be tackling first. There are several approaches to handling request routing, and we'll go on a quick tour of the libraries and approaches before we decide on one and implement it.
The built-in App Engine webapp framework takes an extremely straightforward approach: The incoming request's URL is compared to a list of regular expressions in order, and the first one that matches has the corresponding handler executed. As an enhancement, any captured groups in the regular expression are passed to the request handler as additional arguments. You can see the code that does all this here - it's extremely straightforward and easy to follow.
The webapp module does one thing that I'm not a huge fan of: It ties the request routing in with handling the requests. The same function that finds the appropriate handler for a request also takes care of parsing the request and calling ...
Writing your own webapp framework for App Engine
Posted by Nick Johnson | Filed under python, coding, app-engine, tech, framework
Welcome back! I trust you all had a good holiday period? Mine was spent back in sunny New Zealand, seeing friends and family, visiting favorite restaurants, enjoying the sunshine, and learning to paraglide.
I would have started blogging again last week, but my first week back was made both exciting and frantically busy preparing for, then attending the BT Young Scientist Exhibition, where I gave tutorials on App Engine at the Google booth. But now, back to your regularly scheduled blogging...
Sometimes it seems like everyone has written their own blogging system, and everyone has written their own framework for webapps. That's not all these two things have in common, though: They're both excellent learning projects. Since you've already done the first, why not do the second? This will be the first of a series of posts covering how to write your own Python webapp framework. The framework, while targeted at App Engine, isn't exclusive to it.
As with the blogging project, it helps to set some goals before we get started. Here's our goals for this project:
- Lightweight. With cold startup time being a significant concern for many, it's essential to avoid creating ...
OpenID on App Engine made easy with AEoid
Posted by Nick Johnson | Filed under python, coding, app-engine, tech
I'm pleased to present AEoid, a new App Engine library that aims to make user authentication with OpenID on App Engine simple.
AEoid is extremely easy to install, comprising a single piece of WSGI middleware, and its interface mirrors that of the App Engine Users API. Here's an example of it in action:
from aeoid import users

class TestData(db.Model):
  user = users.UserProperty()

class TestHandler(webapp.RequestHandler):
  def get(self):
    user = users.get_current_user()
    if not user:
      self.redirect(users.create_login_url(self.request.url))
      return
    logging.warn("Logged in as %s (%s)", user.nickname(), user.user_id())
    data = TestData(user=user)
    data.put()
As you can see, the interface to AEoid is almost exactly identical to the App Engine Users API. There a few differences of note:
- Users are identified uniquely by their OpenID endpoint.
- You can't construct a User object without specifying an OpenID URL.
- Nicknames and email addresses are user-supplied, so they're not guaranteed unique or validated.
- is_current_user_admin() is not yet implemented.
- login: clauses in app.yaml are not affected by AEoid - they still authenticate using the regular Users API.
Installation
Installing AEoid is a simple matter of adding its WSGI middleware to your app ...
'Most popular' metrics in App Engine
Posted by Nick Johnson | Filed under python, coding, app-engine, tech, datastore
One useful and common statistic to provide to users is a metric akin to "7 day downloads" or "7 day popularity". This appears across many sites and types of webapp, yet the best way to do this is far from obvious.
The naive approach is to record each download individually, and use something akin to "SELECT count(*) FROM downloads WHERE item_id = 123 AND download_date > seven_days_ago", but this involves counting each download individually - O(n) work with the number of downloads! Caching the count is an option, but still leads to excessive amounts of work at read-time.
Another option is to maintain an array of daily download counts, keeping the last 7. This is an improvement from a workload point of view, but leads to either discontinuities at the start of a new day, or to all counts being updated only once per day.
There is a third option, however, which has the performance of the second option, with the responsiveness of the first. To use it, however, we have to reconsider slightly what we mean by '7 day popularity'. The solution in question is to use an exponential decay process. Each time an event happens, we increase the item's ...
DIY USB preloading with *nix
Posted by Nick Johnson | Filed under go, tech, coding
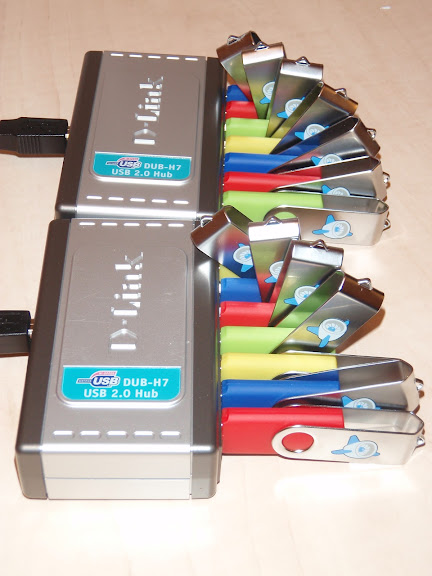
Having recently received a large number of USB flash drives, I needed a solution for preloading them in bulk. Dedicated USB preloading/flashing devices are pricey - starting at over 500 euro for a small model - and while the preload services most companies offer (including Memotrek, the company we ordered the drives from) are handy, they add an extra 50c or so to the price of each drive, and the preload is quickly out of date. With that in mind, I decided to go the DIY route. This post documents my attempts and the final (successful) result.
To start, you need a lot of USB ports. I purchased two D-Link DUB-H7 7 port USB hubs, but any hubs ought to do, as long as the spacing between the ports is sufficient to accommodate a flash drive in every port. You won't need the included power bricks, as the power provided by the USB host is sufficient even for 7 UDB flash drives.
The general process of bulk flashing goes something like this:
- Plug in one of your drives. Wipe it with "dd if=/dev/zero of=/dev/your-drive bs=1M", partition and format it, and write the data you want ...
Implementing a DHT in Go, part 2
Posted by Nick Johnson | Filed under go, tech, dht, coding, kademlia
In the previous post, we started a straightforward implementation of a Kademlia Distributed Hash Table in Go. Today, we'll add in the real meat - interaction between peers to find nodes.
First, though, a correction to the previous post. There were a couple of errors in it, the most notable of which is that the routing table's FindClosest method failed to order the returned results correctly. The original implementation ordered results by their absolute node ID, but the correct ordering is by their ID xor the target ID. To my shame, my rudimentary unit tests did not catch thils. This is now fixed in the original article with the introduction of a 'ContactRecord' struct.
Let's start by defining a Kademlia struct to hold information about a Kademlia network:
type Kademlia struct {
  routes *RoutingTable;
  NetworkId string;
}

func NewKademlia(self *Contact, networkId string) (ret *Kademlia) {
  ret = new(Kademlia);
  ret.routes = NewRoutingTable(self);
  ret.NetworkId = networkId;
  return;
}
Note the presence of the 'NetworkId' field in the above code. This is an arbitrary string that should be unique for each deployment of our Kademlia implementation, to prevent different instances of the network merging together.
Go supports RPC calls using its built in ...
Newer Older