Using OpenID authentication on App Engine
Posted by Nick Johnson | Filed under python, openid, app-engine, coding, clickpass
With the release of SDK 1.3.4, preliminary support is available for native OpenID authentication in App Engine. Today, we'll demonstrate how to use the new OpenID support in your app.
Edit: There's now an official article on OpenID on App Engine!
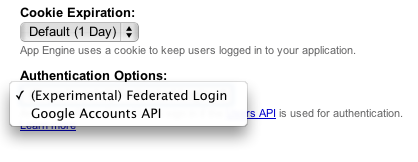
The first step in setting up OpenID authentication is to change your app's authentication settings. Log in to the admin console, select your app, and go to "Application Settings". There, you can pull down the "Authentication Options" box, and select "(Experimental) Federated Login".
Once you've enabled OpenID authentication for your app, a few things change:
- URLs generated by create_login_url without a federated_identity parameter specified will redirect to the OpenID login page for Google Accounts.
- URLs that are protected by "login: required" in app.yaml or web.xml will result in a redirect to the path "/_ah/login_required", with a "continue" parameter of the page originally fetched. This allows you to provide your own openid login page.
- URLs generated by create_login_url with a federated_identity provider will redirect to the specified provider.
In order to make best use of this functionality, here's what we'll do:
- Provide an OpenID login page on /_ah/login_required
- Have this login page use create_login_url to redirect users to their openid login page.
- Modify existing calls to create_login_url to instead send users to /_ah/login_required
Here's a straightforward implementation of the /_ah/login handler:
class OpenIdLoginHandler(webapp.RequestHandler):
  def get(self):
    continue_url = self.request.GET.get('continue')
    openid_url = self.request.GET.get('openid')
    if not openid_url:
      path = os.path.join(os.path.dirname(__file__), 'templates', 'login.html')
      self.response.out.write(template.render(path, {'continue': continue_url}))
    else:
      self.redirect(users.create_login_url(continue_url, None, openid_url))
This handler takes care of the first two changes we described earlier. First, we retrieve the 'continue' parameter (if it's provided), and the 'openid' parameter. If no openid parameter is provided, we show the login form. If an openid URL is provided, we pass both that and the continue URL to create_login_url, redirecting the user to the URL that function generates.
Here's an excessively simplistic version of the login.html template:
<html>
<head>
  <title>Log in with OpenID</title>
</head>
<body>
  <h1>Log in with OpenID</h1>
  <form method="get" action="/_ah/login_required">
    {% if continue %}
      <input type="text" name="continue" value="{{continue|escape}}" />
    {% endif %}
    <input type="text" name="openid" />
    <input type="submit" value="Log In" />
  </form>
</body>
</html>
As you can see, all the page does is solicit the user's OpenID URL, and send it back, along with the already-provided continue URL, to the same handler we looked at earlier.
Now that we've got basic OpenID support working, we should modify our app to send users to our own login page, instead of the default one for OpenID login with Google accounts. To do this, we'll define a simple function to take the place of create_login_url in these places:
def create_openid_url(continue_url):
  continue_url = urlparse.urljoin(self.request.url, continue_url)
  return "/_ah/login?continue=%s" % urllib.quote(continue_url)
Then, we replace any invocations of "users.create_login_url(something)" with "create_openid_url(something)" throughout our code, and we're done!
Friendlier login pages
The login page we demonstrated is pretty spartan. That's easily fixed, of course - you can style it as you would the rest of your site, and add descriptive text, and so forth. Worse, though, many users, when asked for their "openid URL" will simply look at you in puzzlement. What we need is a solution that avoids the need for most users to enter their URL themselves, while still allowing savvy users to do just that.
Fortunately, there are a number of such solutions. One of them is clickpass. After signing in there and setting up an entry for your site, they'll provide you with code for a button that you can embed in your login page, and which allows users to choose from a number of well-known identity providers, including Hotmail, Yahoo!, Google, and Facebook, as well as entering their own URL.
Once you've added your site in Clickpass, click on 'Log users in', and you'll be asked for a few details. Here's what they ask for, and how you should fill it out:
| OpenID trust root | The root URL of your site, eg http://myapp.appspot.com/ or http://www.myapp.com/ |
|---|---|
| begin_openid_login | /_ah/login_required |
| OpenID parameter label | openid |
| Submission method | GET |
| SSL enabled | True if you're hosting off appspot.com and have "secure: optional" or "secure:required" for your URLs; false otherwise. |
There's one further advantage of using a system such as ClickPass's: You can embed the button widget on any and all pages of your site - which means your users don't have to visit your login page at all in the usual case: they'll go straight from your site to their provider's login page.
Previous Post Next Post